
Image © Gonzalez, Unsplash+
People see the finished product. They see the beautiful cedar, the glowing heater, the look of pure bliss on someone's face as they step out of their new sanctuary. What they don't see is the process. They don't see the pile of lumber, the coiled wires, the sawdust, and the dozens of critical decisions that have to be made at every single step. Building a sauna isn't like assembling a bookcase. It’s a real construction project. It's a box of intense heat and steam, and it has to be built right, or it will fail in spectacular and sometimes dangerous ways.
I've spent my career in the guts of these rooms, from framing the walls to wiring the final connection. My goal is to give you my personal checklist—the framework I use on every job—to guide you from an empty corner in your basement or yard to that first, perfect, well-earned blast of steam.
First, What Are We Actually Building? The Soul of a Sauna
I have to start here, because there's a lot of junk out there being called a sauna. A real, traditional sauna, the kind we're talking about building, has three non-negotiable requirements. This is the soul of the thing.
- The Room: It must be a dedicated room, insulated and built from raw, untreated softwood like cedar, aspen, or spruce. No paint, no varnish, no drywall. Just wood that can breathe and manage humidity.
- The Heater: You need a legitimate sauna heater—electric or wood—that is powerful enough to get that room to at least 180°F (82°C). Not 150°F. 180°F is the baseline for an authentic experience.
- The Stones: The heater must hold a significant quantity of specific sauna stones that get intensely hot, hundreds of degrees. Why? So you can throw water on them to create *löyly*—a proper, rich, enveloping steam.
If your project doesn't have these three things, you might be building a nice hot closet or an infrared box. But you are not building a traditional sauna. Now that we're on the same page, let's build one right.
The DIY Sauna Build Framework: My Step-by-Step Process
This is your roadmap. Do not skip a step. Do not do them out of order. This is the process, learned over hundreds of builds and a few painful mistakes early in my career.
Phase 1: The Foundation (The Most Important Work)
The success of your sauna is determined before you hammer a single nail. This is the "measure twice, cut once" phase. Getting this wrong is the most common reason projects fail.
- Planning & Permits: Choose your location, finalize your size, and for the love of god, make a five-minute call to your local building department. Ask about permits and, for outdoor saunas, property line setbacks. It's the cheapest insurance policy you can buy.
- The Foundation: It needs to be perfectly flat, perfectly level, and made of a material that can handle moisture. An unlevel base is the #1 cause of warped doors and leaky seams. For an indoor sauna, concrete or tile is ideal. For an outdoor sauna, a compacted gravel pad is excellent.
- The Electrical Plan: Get a quote from a licensed electrician *now*, not later. For a traditional sauna, you'll need a dedicated 240V circuit. The cost to run this line is a real, and often significant, part of your budget. Knowing this number upfront prevents nasty surprises.
I learned the hard way about getting the foundation perfect. Early in my career, a client had built his own foundation on a slight slope. He swore it was level. We built the sauna kit on top of it, and everything seemed fine. A month later, he called, frustrated, because the beautiful custom door wouldn't close right. I went back out there with my longest level, and sure enough, the whole structure had settled about half an inch on the low side after a few rains. The entire 1,000-pound sauna was twisted. We had to use a series of automotive jacks and cribbing blocks to carefully lift the entire structure and re-shim it. It taught me a valuable lesson: "close enough" is never level enough. You have to be precise.
Phase 2: The Insulated Box (The Guts of the Sauna)
This is where your hot room takes shape. A sauna wall is a layered system, and every layer is critical for performance and safety.
- Framing: Standard 2x4 wood framing is perfect. Keep your ceiling height to 7 feet to keep the heat down where you can enjoy it. Frame out your door, benches, and any windows.
- Electrical Rough-In: This is when your electrician runs the wire from your panel to the heater location, and for any lights or outlets.
- Insulation: You need insulation that can handle heat and potential moisture. I exclusively use Rockwool (mineral wool) insulation. It has a high R-value, is fire-resistant, and doesn't support mold growth. Standard pink fiberglass insulation is not ideal; it can lose its insulating properties if it gets damp.
- The Vapor Barrier: This is the most critical and most often botched step. After insulating, you must staple a special, foil-faced vapor barrier to the *inside* of the studs, completely encapsulating the room. This reflects heat back into the sauna and, most importantly, prevents steam from getting into your wall cavity and causing rot.
I once did a tear-down of a 10-year-old DIY sauna where the owner had read online that he could use standard 6-mil plastic sheeting from the hardware store as a vapor barrier. When we opened the wall, the smell hit us first—the unmistakable odor of rot and damp drywall. The plastic had melted and sagged near the heater, but the real discovery was in the corners, far from the heater, where the plastic was still intact. Behind it, the wall cavity was a black, moldy, rotten mess. It taught me a critical lesson: the failure isn't just about melting. Standard plastic traps moisture, creating a perfect dark, warm incubator for mold. A foil barrier, on the other hand, doesn't just resist heat; it also allows the wall assembly to breathe and dry correctly. It's a small detail in material choice that prevents a complete disaster.

Phase 3: The Sanctuary (Finishing the Hot Room)
This is where your hot box starts to look and feel like a beautiful room.
- Interior Cladding: This is your tongue-and-groove cedar or spruce. Use stainless steel nails to prevent rust streaks. Start from the bottom and work your way up.
- Benches: The benches need to be strong, comfortable, and at the right height. A good rule of thumb is that the upper bench should be high enough so that your feet are at or above the level of the sauna stones. This keeps your whole body in the best heat.
- Heater Installation: Follow the manufacturer's instructions for safety clearances to the letter. This is a critical safety step. This is also when your electrician comes back to do the final hookup and commissioning.
- Finishing Touches: Install the door (make sure it swings *out* for safety), the lighting, the vents, and any trim.
The Hill I Will Die On: Do Not DIY The Electrical
I have to say this with no room for debate: you must hire a licensed electrician. We're talking about putting a high-amperage, 240-volt heating appliance in a small, enclosed wooden room that you and your family will sit in. This is not the place to save a few hundred dollars by watching a YouTube video. It is the single most important safety decision you will make in the entire project. Find a pro. Get a permit. Sleep well at night.
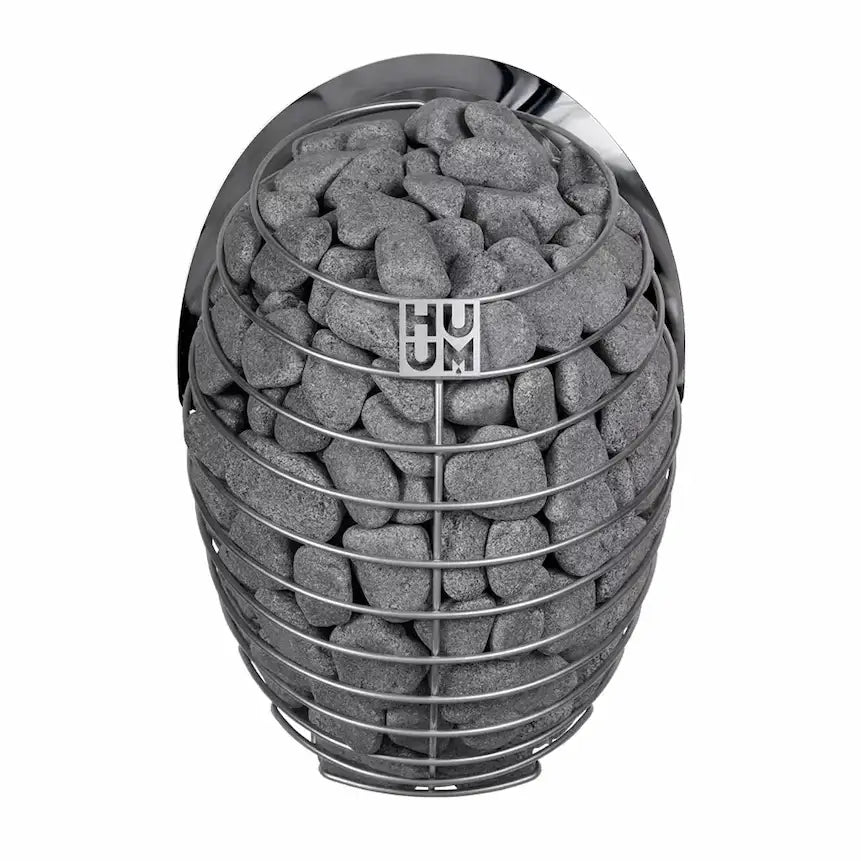
HUUM DROP 6kW Electric Sauna Heater
The iconic teardrop heater, perfect for delivering soft steam in small to medium-sized saunas.
My Pro Tip: When you're planning your bench layout, don't just think about where you'll lie down. Think about where you'll sit up. The top bench should be at a height where, when you're sitting, your feet can comfortably rest on the lower bench. This is far more comfortable than having your feet dangling in the colder air near the floor. It's a small ergonomic detail that makes a huge difference in the overall experience.
Troubleshooting Your New Build: My Field Guide
You've finished. You're proud. But something's not quite right. Here's what I look for first.
The Swollen Door: A Cautionary Tale of Ventilation
A client called me, frustrated. "John, my beautiful custom sauna door is swelling up and getting stuck!" I went out there, and his sauna was gorgeous. But I noticed something was missing. There was no exhaust vent. He had an intake vent under the heater, but no way for the hot, humid air to escape after his session. He was trapping all that steam inside the room, and the wood in the door was soaking it up like a sponge. We had to cut in a proper high exhaust vent, and the problem was solved. A sauna must breathe.
Here's a quick breakdown of other common new-build issues:
- It's not getting hot enough. It's almost always an undersized heater or gaps in your insulation or vapor barrier.
- There's a cold draft on my feet. Your intake vent is in the wrong place. It should be located low on the wall, directly underneath your sauna heater.
- The wood behind my heater looks dark. Your safety clearances are too small. This is a serious fire hazard. Fix it immediately.
- My new cedar smells *too* strong. That's normal. Do a few "bake-off" cycles. Get it really hot for a couple of hours with the vents open to mellow out that initial, overpowering smell of fresh cedar oils.
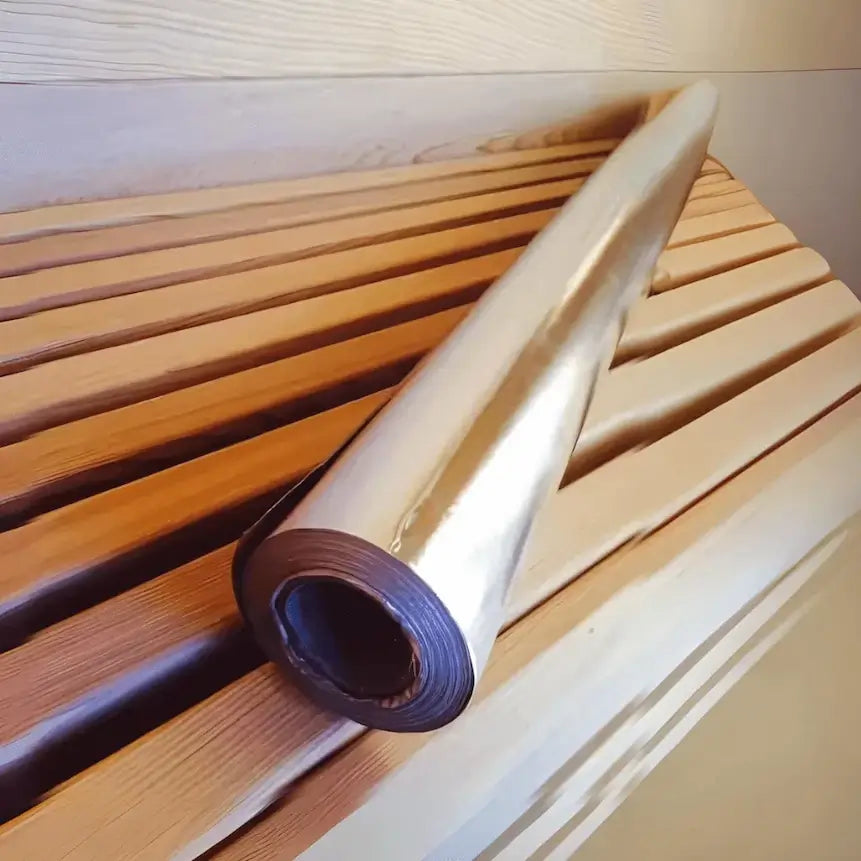
Sauna Foil Vapor Barrier
This is not optional for an indoor build. A high-heat foil vapor barrier is the only way to protect your home's structure from moisture damage.
My Final Word: The Reward Is in the Work
Building your own sauna is a journey. It will test your patience. It will make you double-check every measurement. But if you follow a solid plan, respect the materials, and don't cut corners on safety, the reward is immense.
I have a longtime client, a couple who built their own sauna in their backyard cabin. They followed the plans, did everything right, and they absolutely love it. They didn't use a kit; they sourced all the lumber themselves. The husband told me the best part wasn't even using the sauna, but the immense pride of building it together, knowing they had created this incredible, high-performance space with their own hands. He said it was the most rewarding project they'd ever done. That's the other side of the coin. When it goes right, it's magic.
Plan first, build once. You'll end up with a sanctuary you're not just proud of, but one that will serve you and your family well for decades.
Ready to Do This Right?
I hope this helped you feel more confident in your setup. If you want hands-on advice or product recommendations, just reach out.
Contact Our Team
Explore All Sauna Heaters